How To: Paint Your Own Pocket Baby Yoda For May The 4th
With Star Wars Day coming up but Coronavirus keeping us in lockdown, we can’t go out and celebrate with our friends. Maybe you’re planning on dressing up and throwing an online watch party with your friends and family, perhaps you’re playing a Star Wars board game at home, or maybe you’re just wondering why the heck all the best Baby Yoda items are STILL on pre-order? If you’re impatient to get your Baby Yoda fix like we are at CostumeBox, we have the perfect Baby Yoda DIY craft guide for May the 4th.
What you’ll need:
- A piece of clothing. You can choose any type of clothing so long as it has a pocket, otherwise you can also paint your own pocket if you don’t have one.
- Fabric paint. Here at CostumeBox, we have a great selection of fabric paint available. We recommend using fabric paint over acrylic paint as acrylic will dry thick and doesn’t fuse properly to fabric, causing it to crack over time and ruin your masterpiece. For this project, we’re using emerald green (117), true red (106), white (123), black (122) and brown (120) from our Jacquard textile paint range.
Source: CostumeBox
- Paint brushes. You’ll need at least two: one thin brush for detailing and outlines and a thicker one for painting wider areas and solid colour. You can also find these in CostumeBox’s craft range.
- Other tools. You’ll need a small container or jar for water to wash your brushes and dilute the paint if you need to, something to mix paint on, a pair of scissors, cardboard or some plastic to place between your clothing fabric.
Now you’re ready to make your own pocket Baby Yoda!
Let’s get started:
1. Choose your item of clothing. We’re going with a denim skirt and painting our Baby Yoda in the back pocket.
2. Choose and print your Baby Yoda image. We suggest picking one where it’s looking up or sitting in its pod. As you print out the image, you’ll want to scale it so it will fit the size of your pocket. If you don’t have a printer, you can draw it freehand with a fabric pencil or have it up on your computer to trace an outline onto a piece of paper or tracing paper to then cut out and outline onto your fabric.
3. Cut out your image. Make sure to cut exactly around Baby Yoda leaving a proper stencil outline as we will need this for the next step.
4. Now you should place that piece of cardboard or plastic inside your garment so it doesn’t stick together while you paint!
5. Trace your stencil. Position your stencil over the pocket and paint inside it in one solid colour: either white or Yoda green (to make Yoda green, mix white with a smaller amount of green and brown). You can also use the Baby Yoda image cutout and trace around the outside before painting and filling in the middle.
6. Paint! Depending on your level of skill, you can start to paint from the base layer up, mixing colours as normal. If you are just beginning your painting journey and need more guidance, an option could be to cut your printed Yoda image into pieces based on the different colours in the image to then trace onto your base and start painting by colour similar to the image below. If you use this technique, you can still follow the below steps in order just outlining the pieces before painting.
HOW TO PAINT:
Paint step 1.
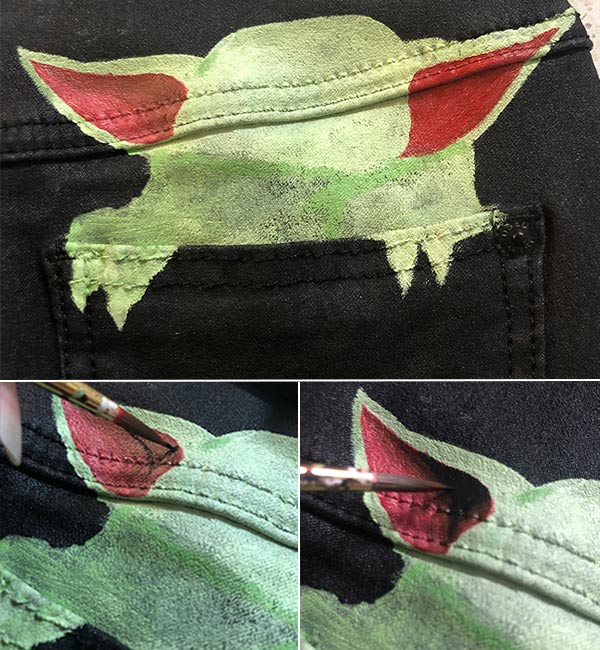
Make sure your base is dry before continuing (you can use a hairdryer to speed things up). Paint on the ears with red or pink, then come in with a darker red or brown toward the top, finishing with black in the top inner corner near the head and blend it out.

Paint step 2.
Add some shading to the ears where the ears meet the head to start building dimension. Let dry.

Paint step 3.
Start penciling in, a rough outline of Baby Yoda’s features. Or if you’re more confident, you can paint them using the same colour you used for shading. (Note: if you make a mistake, you can come back in with green or wet and dab away lines with bits of water and a cloth).

Paint step 4.
Time for the cute Yoda eyes! Starting with the white, paint the corners of the eyes. Don’t worry about painting too much into the center. Once dry, you can fill in the center with black and come in over any white bits to give a crisp line and now you have your opportunity to fix any white sections that may have been painted too thick. Let dry and add in the eye highlights with white.

Paint step 5.
Start painting in highlights (cream or light brown) and shadow (dark green) around Baby Yoda’s face, eyes and forehead grooves.

Paint step 6.
Now you can start the cloak. Start with a solid light brown colour to paint the whole cloak section and then blend in with a darker brown around the folds and creases of the cloak to add the shading. Once done, you can add white highlights in as well and then paint the shading and highlights on Baby Yoda’s hands and claws to finish.

Paint step 7.
Let dry and then outline! Using your thinnest brush with black paint diluted slightly with a bit of water, you can start carefully outlining your masterpiece and adding in any extra bits of detail like knuckles, creases and it's cute little facial features.

AND YOU’RE DONE! Now you’re ready to carry Baby Yoda in your pocket with you on all your adventures.


