Published: 08/08/2022
Lion Face Painting For Book Week
SFX Creative Makeup Artist | Content Creator
Nikki is a Sydney-based Content Creator who embraces bringing the "bright side of you" out by taking watchers on an artistic journey and inspiring others to get creative! She specialises in SFX Creative Makeup that may involve a Disney character or two, but come Halloween time things get spooky!
Lion Face Painting For Book Week
Step-By-Step Guide
In collaboration with @brightsideofnikki
SFX Creative Makeup Artist | Content Creator
Nikki is a Sydney-based Content Creator who embraces bringing the "bright side of you" out by taking watchers on an artistic journey and inspiring others to get creative! She specialises in SFX Creative Makeup that may involve a Disney character or two, but come Halloween time things get spooky!
Nikki is a Sydney-based Content Creator who embraces bringing the "bright side of you" out by taking watchers on an artistic journey and inspiring others to get creative! She specialises in SFX Creative Makeup that may involve a Disney character or two, but come Halloween time things get spooky!
Learn how to create a Lion Face Paint that's perfect for Book Week.
Our Step-By-Step Animal Designs created in collaboration with Nikki from @brightsideofnikki will help you transform your child into one of 4 animals! The best part is you don't need to be a professional artist to achieve the look.
All designs are created using our Monotint 6 Piece Book Week Face Paint Kit and you can customise your design to any colour you wish.
Happy Painting and don't forget to tag us in your photos as we want to see your creations!
Look 1 - Cat
1. Using a sponge and the white paint, paint a semi-circle above the lips.
2. With your first chosen colour, using a sponge or brush apply it to the bottom part of face.
3. Then with your second chosen colour apply it to the upper part of the face with the child’s eyes closed, using the sponge to blend smoothly. Or just apply the one colour!
4. Use a baby wipe to clean up the edges if you need to, but they don’t need to be perfect.
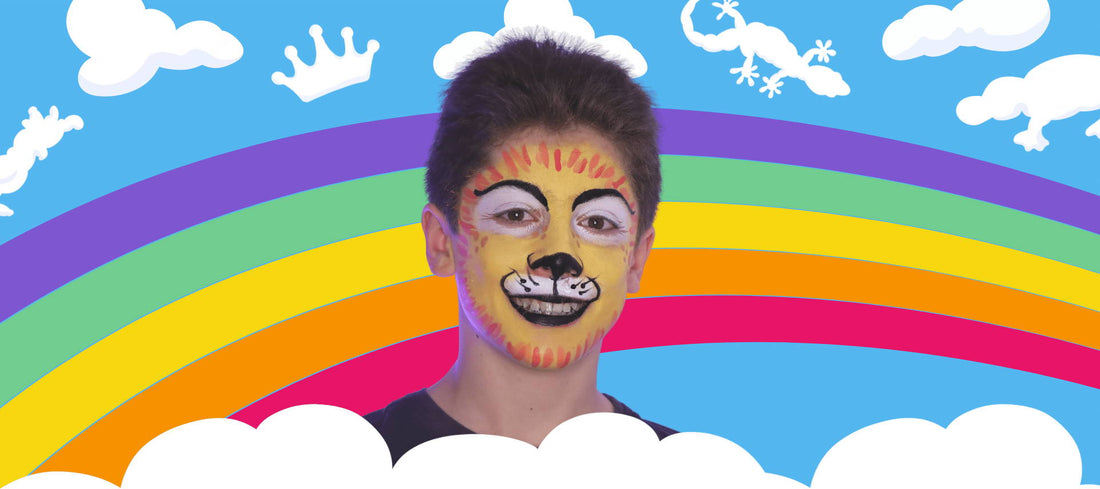
Lion Face Paint
-
1. Starting with the white paint, use a face sponge or a brush to paint the eyes and mouth area.
2. Then go in with the yellow paint to cover the face where the white didn’t touch.
-
3. Add yellow and red to mix, but keep them separate as we will be mixing different shades as we go! With the first shade, more yellow then red, draw a few lines around the of the outer face to begin the lions mane.
4. Then add a bit more red to darken the shade, and repeat.
5. And repeat as many times as you like until you feel the lions mane is complete (or until the little kidlet cannot wait any longer)!
-
6. Now for the lion freckles, mixing a brown paint flip the brush so you are using the wooden/plastic end, dip in the paint and dot the freckles on the face near the outer and inner corner of the eyes.
7. With the black paint and a thin brush paint the lion eyebrows starting from the inner corner upwards.
8. Then paint the nose in a gentle “W” motion, hooking around the nostrils a bit.
9. Paint a line from the middle of the nose to the top of the lip, and paint the lip black.
10. Following the lines of the lips, paint two small lines in an upwards motion outlining the white upper mouth area.
11. Flip the brush and dip the wood/plastic side in the black paint and dot the whisker spots on the upper mouth area.
12. Then flip the brush again and draw your whiskers!
13. Give your kid to give you a good RAWR and you are done!
Lion Face Paint
1. Starting with the white paint, use a face sponge or a brush to paint the eyes and mouth area.
2. Then go in with the yellow paint to cover the face where the white didn’t touch.
3. Add yellow and red to mix, but keep them separate as we will be mixing different shades as we go! With the first shade, more yellow then red, draw a few lines around the of the outer face to begin the lions mane.
4. Then add a bit more red to darken the shade, and repeat.
5. And repeat as many times as you like until you feel the lions mane is complete (or until the little kidlet cannot wait any longer)!
6. Now for the lion freckles, mixing a brown paint flip the brush so you are using the wooden/plastic end, dip in the paint and dot the freckles on the face near the outer and inner corner of the eyes.
7. With the black paint and a thin brush paint the lion eyebrows starting from the inner corner upwards.
8. Then paint the nose in a gentle “W” motion, hooking around the nostrils a bit.
9. Paint a line from the middle of the nose to the top of the lip, and paint the lip black.
10. Following the lines of the lips, paint two small lines in an upwards motion outlining the white upper mouth area.
11. Flip the brush and dip the wood/plastic side in the black paint and dot the whisker spots on the upper mouth area.
12. Then flip the brush again and draw your whiskers!
13. Give your kid to give you a good RAWR and you are done!
All looks created using our Monotint Book Week Liquid Face and Body Paint Pack of 6.
What are your Book Week ideas? Please comment and share below.


